My Whimcees

My Whimcees

Friday, July 31, 2009

The Finished Red Birdhouse


Hello!

I finally finished the red birdhouse! Hope that you like it!

Have fun making your own and I would love to see photos!


Butterfly: SU God's Beauty Stamp Set, SU Apricot Appeal and Pumpkin Pie Markers

Flowers: SU Summer Sun and Garden Green CS, SU Real Red Marker

Leaves: SU Garden Green CS

Miscellaneous: SU 1/4" Circle Punch, Other Flower Punch and Leaf Punch, Glue Dots, Scissors


Thank you for stopping by!

Take care!

Barbara Diane

Thursday, July 30, 2009

The Red Birdhouse Tutorial


I have had requests for a tutorial of how I made the birdhouse I posted. So, here it is.

I hope that you enjoy making one of your own! I would love to see photos and I will post them on my blog! You can e-mail me at bdr@chorus.net and send them as an attachment. :<} I hope to hear from you!

The template that I used to make the birdhouse in this tutorial can be found on Nichole Heady's blog, "CAPTURE the moment". Thank You! Nichole for this fun project and for sharing such a great blog! Click on this link to download your own free copy! Download Bird Box Template

Print the birdhouse template directly onto the card stock or trace around it and cut out. The roof of the birdhouse will be cut separately later and the measurements are printed on the template sheet. I printed my template to the backside of this great barn-like red with white stitching paper from the SU Washington Apple DP series.

Don't forget to cut all the tiny lines around the curved sides.


Using a bone folder and a ruler, score all the printed fold lines - starting with the straight lines first - and press them in towards the center.


Carefully score the curved fold line on each side of the front and back walls of the birdhouse with your bone folder. These fold lines must be accurate to insure that the curves of the walls of your birdhouse are smoothly rounded and meet where the roof joins the walls.

The second photo shows the curved sides of the front of the birdhouse are folded in and ready to glue to the side walls.


When you are finished scoring and folding all the lines, your template will look like this. Here I have put Sticky Strip on the INSIDE of the straight side walls of the birdhouse where they will be attached to the curved front walls. (Do NOT put the adhesive on the curved walls!)


Now put Sticky Strip also on the slanted top edges of the front and back walls where they will be attached to the roof. This goes on the OUTSIDE of the front and back walls.


It's time to attach the straight edge of the side walls to the curved sides of the front and back walls of the birdhouse. Working on ONE SIDE of one wall at a time, remove the Sticky Stip's protective layer and starting at the bottom of the wall, slowly bring the two sides together - the straight cut edge laying on top of the folded curved edge - as you work your way up the wall.

Take your time, as the results of your first few attempts to do this may not be as smooth as you'd like them to be - but each time it gets easier! I would strongly suggest using Snail adhesive until this step becomes familiar to you, as Sticky Strip is NOT forgiving! :<} Especially not on paper! When it's glued, it's glued - which is nice when you don't have to worry about something coming apart - but not when you want to fix an error and start over! :<}


After each of the straight edges has been glued to a curved wall of the birdhouse, use your bone folder to press down on the "seam" on the inside to help to form a smooth curve.


Do all 4 sides and you have the birdhouse together! Now it is time to add a roof.

But first, press the corners of the top of the side walls (where you did not yet add the Sticky Strip) to the front and back walls where you have put the Sticky Strip that will be glued to the roof - after removing the protective layer.


Cut the roof piece according to the measurements in the template pattern and score/fold it in half. I cut the roof for my birdhouse from SU Riding Hood Red CS - as that is the same color as the DP I used - and ran it through my Cuttlebug using their dotted swiss embossing folder to give it a texture.


So at this point, your birdhouse and roof pieces are now ready to assemble.


A Tip:

This is something I do to make it easier to attach the roof so that the sides remain straight and stable and stay where you want them - as the top edges of both sides of the front and back walls have Sticky Strip on them and you will be attempting to attach the roof to the birdhouse.

First I cut 2 small stips about 1/2 " wide and the width of the side walls.


I then glue one end of the first small strip to the front wall side and the other end of that same stip to the back wall side - and repeat with the second strip - each strip being glued just below the peak.

This will hold the two side walls straight so that one or the other doesn't lean out or cave in as you are trying to make sure that they don't become glued until you have them lined up with an even overhang on each side and the peaks of the front and back walls meeting in the half line fold of the roof. It can be quite the juggling act! :<}


Now with the small strips in place - and the protective layer removed from the Sticky Strips on the front and back wall edges - the roof can be glued to the birdhouse!


A Tip:

When attaching the roof, I do not set the roof down onto the birdhouse from above. Even with the front and back walls straight and secure with the small strips attached, holding the roof in that position did not allow me to see clearly if the overhang was evenly spaced on each side and/or if the front and back wall peaks were meeting at the fold in the roof. Once again, if it gets glued before you have it lined up - it is glued - and you have a crooked roof. Trust me. :<}

What I do is lay the birdhouse down on to the roof.

First, with the protective layers removed from the Sticky Strip on both the peaked front and back wall edges of ONE HALF of the birdhouse, I line up across from peak to peak - so that it is even along side the center fold of the roof - while still holding it ABOVE the roof piece. Then when I can see that the overhang on each side is even and the peaks are at the center fold line of the roof, I set it gently down on the roof, so that it does not move in the process.

This photo is a little blurry - taking photos with one hand while attempting to do what I just wrote with the other - doesn't always work out so well! :<} Hopefully it is clear enough so that you can see what I mean.


Before I attach the other side, I set the birdhouse down on its base - with just the one side glued to the Sticky Strip - so that I can press down the edges that have been glued to make sure that they are secure along the entire ridge on either side of the roof line.


Then I repeat this process by gently and carefully folding down the TOP HALF of the second side of the roof, pressing along the edges to secure.


When it is glued and secure HALF WAY down the second side, I then turn the birdhouse UPSIDE DOWN - so that the roof is now on your work surface once agian - and I sort of "roll" it the rest of the way. I have found this makes the smoothest line where the roof is attached and without bumps or gaps.


As you can see, it creates a nice, even overhang to both sides of the roof - and they look even from both the front and back, because the wall peaks were in the center roof fold and it was easy to see the overhang on the sides as it is was looked at from "under" the roof.


So here is the completed little Red Birdhouse! Tomorrow we decorate it! :<}


Thank you for stopping by today! I hope that you enjoyed my tutorial and that it was easy to follow. Write me if you have any questions. :<}

Take care.

Barbara Diane

Wednesday, July 29, 2009

Correction - Brandy is an Australian Shephard!!!

In my last posting I said that Brandy was a Border Collie. Wrong! She is an Australian Shephard.

And here are some great photos of her that her "mom" sent me today! Thank you Toni!

Summer and winter - this dog knows how to enjoy life!

Enjoying a boat ride on the lake. Lucky girl! Gets to go stay at the cabin!


Having a great time in the snow! These two photos are so Brandy!


Isn't she wonderful?! Love that dog! She is an Australian Shephard!

See you tomorrow!

Barbara Diane

My Friend Brandy

This is my friend Brandy - sitting in her backyard, waiting patiently for me to put away the camera, come down off the deck and join her! :<}


I will be going out to stay with Brandy again this Saturday for a few days. I love that dog and she loves me! She is so funny, when she sees me she starts to bark, whine, yelp, jump around, fall down, etc. - absolute chaos. I just laugh every time. She sometimes gets in trouble for 'being so crazy' but I say, don't get angry at her, she loves me! :<} It is a great feeling to see such joy in someone's greeting. :<} The entire neighborhood can hear her and it sounds like she is in dire distress but they know that she does that when I come to the house, so when it happens and they know the owners are not home, no one calls the police. :<} She does this every time - even when I am staying with her and leave to run an errand or go to an appointment - when I return to the house it is the same happy chaos. :<}

One of my favorite memories of Brandy was the time I brought a friend out to their house and as we walked around to the back of the house where Brandy and my friends were, she saw my friend first. She had not seen her before, so she barked a 'who are you' greeting, but then wagged her tail and said hello. Then she saw me. She fell down, jumped around, barked, whined, yelped - the whole scenerio. It was wonderful! I smile even now when I remember.

I always look forward to spending time with her. She is a Border Collie and a beautiful dog. They live out in the country and have a huge yard and a deck and flowers and bird feeders. I love the peace and quiet there. I live in a very small apartment in the city and being in a house again, with windows all around and space and a large kitchen to cook in and doors to walk directly outside - just being in rooms to walk around in - it's great. Plus, they have a basement in case of storms! :<

Brandy and I have our little routines - we go outside to put birdfeed in the feeders in the front of the house and the one up the hill in the back yard, water and care for the flowers, clean and change the water in the bird bath, put fresh drinking water for her outside, get the mail from the mail box, etc. We sit on the deck or on the front step of the porch, we take a 'tour' of the back yard, we watch TV. Sometimes we take a rest if I am feeling ill - me on the couch reading a library book, she on the floor next to the couch - laying between the coffe table and the couch.

When I am working on my projects she usually sleeps by my feet and if I make a move that may seem like I am getting off the stool to take a break, she is at the patio door, wagging her tail, excited, ready for a trip outside - as if to say "It's about time!" She is getting older now and time I spend with her is very dear to me. She is a very happy and affectionate dog and loves to be petted and given attention. Sometimes we sit on the floor and have 'conversations' and she looks at me with those beautiful eyes and I think how lucky I am to have this dog's affection.

When I sit down to watch TV, or read, she is right beside me in a flash - from wherever she has been sleeping - and will lay beside the chair while I pet her as long as I continue. To me, that is bliss. To sit in the chair, with my feet on a footstool, the blinds on the picture windows drawn back so I can see the birds at the birdfeeders, the sun shining in and my hand on the head of the dog at my side. Pure bliss. And at night she is always either by the bed or in the doorway to the bedroom - safely watched over by my friend Brandy. I simply love her.


Thanks for stopping by today! I will be back again tomorrow with some more new birdhouses to show you.

Take care. Wishing you a great day today!

Barbara Diane

Tuesday, July 28, 2009

The Christmas Tree Base/Box Tutorial


Hello again!

I apologize for cutting the Christmas tree tutorial short last night, but I had to turn off my computer. Severe storms were all around us, but our area was missed and that is good news! So, it is another day and I am here again with the Christmas tree base/gift box and presents part of the tutorial.

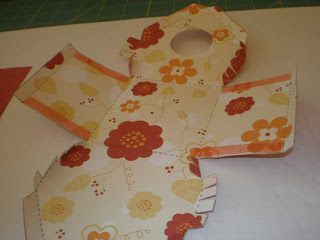
Due to my distraction last night while posting, because of the constant TV storm warnings and photos of tunnel sightings and golf ball size hail, I managed to forget a detail which I will now try to cover in today's post! :<} The base of the tree is also the lid of the gift box it sits on. So continuing my project, I traced the gift box lid template and the gift box template onto SU Real Red CS and cut them out. Then I cut the slot in the center of the gift box lid where the tree trunk will be inserted, folded on all the score lines on both the gift box lid and the gift box and set them aside.


At this point I was ready to assemble the gift box lid. First I folded the small triangular tabs at the bottom score lines and glued them to the bottom side section next to them - until all 6 tabs had been glued in place. See photo below.

(For those of you who have the SU Matchbox die, this step is the same as when you put the sides of the matchbox together).

Then I folded the upper side sections of the lid down over the bottom sections that had been glued to the tabs and my gift box lid was assembled. This created a double thickness edge for the gift box lid walls. See photos below.


(I also forgot to mention in yesterday's post that the tree trunk template has a tab extending from the bottom of the trunk (the trunk is scored at a half way mark on the trunk - top end tree trunk, bottom end tab - and folded upwards after it is inserted into the lid so it can be glued to the underside of the box lid).

When the tree trunk section of the Christmas tree was inserted into the slot of the gift box lid, I pushed it down until the base of the trunk was even with the top of the lid and the tabs were under the lid top. I then folded he tabs upwards towards the bottom of the lid. I divided the trunk tab into 2 sections of 5-trunks each side and made certain that each side of 5 were glued together. I then glued one of the two 5-trunks thick tabs to one side of the slot on the underside of the top of the box lid and the other 5- trunk thick tab to the other side of the slot. I hope this makes sense. Hopefully the photos will explain. :<} I then put the tree/lid aside.


With the Christmas tree and the gift box lid together, I was ready to assemble the gift box. This was done in the same manner as the gift box lid. First I folded the small tabs at the bottom side score lines and glued them to the bottom side sections next to them - until all 6 tabs had been glued in place.

(Once again, those of you who have the SU Matchbox die, this step is the same as when you put the sides of the matchbox together).

Then I folded the upper edge sections down over the bottom sections with the glued tabs and glued in place and I had my gift box completed! As it had in the gift box lid, this created a double thickness edge for the gift box walls. See photo below. (I hate to admit it, but this is the same photo of the gift box lid - as I was photographing this stage of the Christmas Tree Magic Box while dog sitting with Brandy, so guess I missed that one. But the assembly is the same so if you can pretend for a moment that this is the gift box, only with taller sides, that will help! :<}


My Christmas tree/gift box lid and the gift box were now complete. I set the gift box lid, with the previously attached tree, on top of the completed gift box and it was done! I had a Christmas tree sitting on/and attached to a gift box! At this point in time all I could think of was Cool! :<}


It was now time to make the 3 presents to be placed under the Christmas tree! Must not forget Christmas presents! :<} The following photos show how the present templates were scored, folded and glued.


The photos are pretty self explanatory I think, but here are the directions.

I used SU Summer Sun, Brilliant Blue and Certainly Celery CS for the presents. As in the tree template, when I marked the back of each of the 10 tree templates, I now marked the base of each of the 3 present templates to insure that each present was glued onto the gift box lid properly. If any of the presents were to be glued on its side it would not fit in the space under the tree.

I folded all 4 sides at the score lines and glued a tab to the side next to it, as I had done for the assembly of the gift box and the lid. I folded 3 sides towards the inside of the present and glued the base down onto them. (The 4th side is the top of the present and has an extra edge attached to it}. Then I turned the box over and folded down the top of the box, tucked in the folded edge and my first present was assembled! I then repeated this process to assemble the remaining 2 boxes.

As a last step, I placed the 3 presents under the Christmas tree and glued them to the gift box lid/tree base. I put the corners of the presents under tree branches to sort of 'anchor' them, as that would help to stabalize both the presents and the Christmas tree.


I was finally ready to decorate my Christmas tree, gift box and presents and glue this project onto the center of my Magic Box and then begin to decorate the inside of the Magic Box itself. I had already decorated the top of the Magic Box so that part was done. When I was finished with the inside of the Magic Box - the flowers are what took me hours to make - it was ready to photograph.

You have the option to put this project inside a Magic Box as I did, an Explosion Box or you may want to try to make one of the lovely display boxes that come with this great pattern! I think I may do that sometime in the future to display a project I have in mind! I ordered some beautiful paper flowers from Card Carousel in my last order from them and I think it will be a stunning project that will deserve a display box so it can be kept out in the open! :<} I am making this project for myself!

I truly hope that you enjoyed this tutorial. I can tell you it takes a long time to make one of these - and it is hours of work! :<} I was only half done with this posting today, when I had to leave for an eye appointment and after returning home I could see even less than when I left, but I was determined to FINISH this tutorial TODAY, so I have been typing this half blind and it is SLOW going :<} So here it is, warts and all as they say. :<} I absolutely canNOT make corrections one more time!

Thank You! to all of you who sent such kind comments and asked for directions on how I made this project! I hope that I did not let you down and that you enjoyed my journey!

Take care. I will be back again tomorrow with a new post - but not another tutorial again for awhile I think - or maybe just a short one! :<}

Barbara Diane

Monday, July 27, 2009

The Christmas Tree Tutorial

Finally I am posting!

I have been gone all day, driving my son to an appointment, taking care of numerous errands that we had to do, taking him home and now we have very strange and spooky weather with actual tornado warnings and tornado sightings all around us! The storm is to hit us in an hour or so. No basement in the apartment building where I live - frightening! I didn't think to check for a basement when I rented this apartment, as I did not know that the older apartment buildings could be "grandfathered" in with many things lacking in the construction! Like a basement!

The Christmas Tree Magic Box was created from two patterns. The tutorial and pattern for the box can be found on my friend Patti's blog at http://www.creationsbypatti.blogspot.com/ where on her Friday, May 29, 2009 post is a Cake In A Box Tutorial. It is a wonderful tutorial and easy to follow! This is the basic pattern and instructions I use for all my Magic Boxes - making adjustments in the height of the box if it is needed to accomodate the 'surprise' inside. The box itself is not difficult to make, it is the inside 'surprise' that takes more effort! :<}

The Christmas tree was made from the 'Christmas Tree Gift Box & Display Box' pattern I purchased from a great company called Card Carousela - a wonderful company that has many fantastic patterns! They are at http://www.cardcarousel.co.uk/store/ The cost of this pattern is US $9.06 plus shipping. The pattern also includes a display box template but I intended to put the tree in a Magic Box so I used only the tree template, the star template, the box template and the present template.

I cannot give you the actual pattern but I can show you a tutorial on how I assembled it. This is a wonderful pattern and I recommend it as one that you would use the templates over and over - especially with the Christmas seaon just around the corner. Yes, it is! :<} All of their patterns are very well presented with excellent instructions to follow - making even the more complicated of their patterns not horribly difficult to assemble. The Dove Cote and the Carousel, which are the 'surprises' in other Magic Boxes I have posted here, are also Card Carousel patterns.

I am very distracted, I must say, as there are so many tornado warnings and funnel sightings and storms with golf ball size hail! All moving our way! So I may have to stop and shut down the computer at any time while posting this tutorial. It is very still outside and dark and weird. But on to the patterns!

Thia is the pattern packet that you will receive if you were to purchase this pattern.


The tree consists of 10 individual sections. I traced the tree section template 10 times on SU Garden Green CS and cut them out. Each individual section needed to be marked on the back so as not to mistakenly glue the front of a section to the back of another section- which would result in an uneven tree. Then each tree section was scored down the middle and folded in half until I had 10 cut and folded tree sections.


After all 10 sections were cut out and folded in half, I glued the back of one individual section to the back of another individual section until I had 5 sections glued together - resulting in half a tree.

Then I traced and cut the star template from SU Summer Sun CS.

The 5 glued together tree sections were then folded open flat and the cut out star was glued to the top of these flattened tree sections. Then I continued adding the remaining 5 individual tree sections one at a time - gluing back to back - until I reached the 10th and final section and that was glued to the first tree section to make a complete tree.


After the tree was assembled and I had made certain that the combined tree trunks were cut straight across at the bottom, it was time to start to assemble the tree base. The base of the tree is also the lid of the box that the tree stands on. In tomorrow's posting I will continue the tutorial.

I hope you enjoyed this tutorial so far! I need to close down my computer now so I will be back in the morning! Thank you for stopping by to visit my blog! Wishing you well.

Barbara Diane