My Whimcees

My Whimcees

Monday, October 5, 2015

My Halloween House 2015 Continues to Evolve

Hello!

It always takes many days to finish one of my altered art house projects, but it still is amazing when I spend 6 - 8 hours a day, multiple days, and find still more to be done! Today's photos are of the trim on the roof. First I added the white patterned paper strips to the roof . . .


then added the black polka dot strips to the chimney.


I wanted a decoration of some kind hanging down from the eaves of the roof and so I took a strip of the green patterned paper that contained a solid design, folded it in half lengthwise and then fussy cut the edges of one side of the strip.


Added to the house roof they were very pretty - so continued all around.


Then I added two of the larger flowers, that I fussy cut from the printed paper I had used to cover the outside walls of the house, to the centers of the dormers.


Good thing I love fussy cutting! :<)


I didn't like that the underside of the green patterned paper used for the overhang showed from underneath and it was a very bold, bright pattern. So back to more measuring for more strips, this time in the white patterned paper that I had used for the trim on the top of the roof.


Then I used a black marker to color all of the undersides of the fussy cut edges of the overhang. Whew! I'm a perfectionist yes, but I love my projects when they're done! :<)

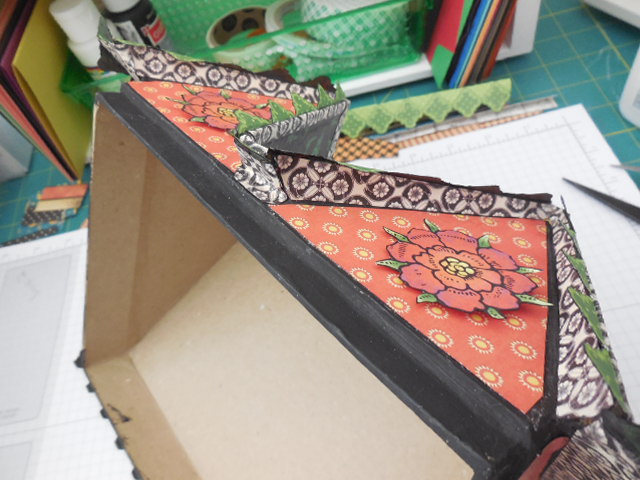

Now it looks much better! Think I am almost finished? Think again! More photos tomorrow!


Thank you for visiting my blog today! I apologize for being so late visiting back! Thank you for your kind comments and e-mails! I will try to play catch-up soon to see all of your what I know will be wonderful creations! Wishing you a happy day today!

Hugs,

Barbara

Sunday, October 4, 2015

Adding Corner Strips, Window Trim and Shutters to the Halloween House

Hello!

It was time to trim the windows and add the shutters to the front of the house. I cut strips of black with white dots to trim the top and bottom of the front windows and all four sides of the windows on the two sides of the house. The back of the house is a solid wall.


Every paper piece I fussy cut I edge with either a black or a brown marker. I don't want any white edges to show. You can see in this photo the difference between the strip edged with black and the raw edge strip. (Click on the photo to see enlarged version.) The white edges really do show and are not as attractive on the finished project. The dark edges blend so much better. I do this to every piece, no matter how small.


I cut long strips to glue onto the four edges of the house. You can also see the layered shutters on the table next to the house, ready to be layered on to give them depth. 


The strips on the house look so pretty!


Here the front windows are edged on the top and bottom . . .


and here are what the side windows look like edged on all four sides.


I also finished a permanent door with hinges.


Here the house has all the shutters on the front windows. I also added a figure to the front to start to get a perspective and a plan for a story for the finished house.


With the roof on it is starting to come together. The roof is far from done and the next phase of this project. Oh, look! Is there someone at the window!


Thank you for visiting my blog today! It is very dark and gloomy here today in this part of WI today. I hope the sun comes out this afternoon! Wishing you sunshine where you are and a happy Sunday creating you own Halloween project!

Hugs,

Barbara Diane

Thursday, October 1, 2015

October 1st - And Progress Made On My Halloween House

Hello!

Happy first day of October! Can't believe it is here already! Thoughts of Halloween, Thanksgiving and Christmas projects going through my head! But one at a time and right now the progress is continuing on my 2015 Halloween House. Today I am sharing photos of making the window frames.

To make the outside window frames, I first taped the strips of paper to be used for the frames to the outside of the house I was working on - remembering to have the paper side that you want showing in your frames to be facing out.


Then turn the house over so the outside wall with the strips taped to it is on the bottom, laying flat on the surface, and trace the windows from the inside. A ballpoint pen works well.


This house has an outside base, so I had to lay the house on top of some paper packs the same height as this base to lift it off of the table so the wall of windows I was tracing was laying flat on a surface to allow me to trace around the windows. Does that make sense?


After you have traced the windows - remember BEFORE you make one pen mark that this should be the backside of the paper - be sure to draw an arrow to indicate which is a top window or a bottom window and is it the left or right side of the wall. None of the windows is exactly the same in most all of the paper mache houses, and if you choose to skip this step, you may have difficulty - and much time lost - in deciding which window is which. Don't say I didn't warn you! :<) Been there, done that.


The easiest way I have found to fussy cut inside small areas is to cut from the center to the four corners and then cut around the sides, working your way around from one corner to the next until you have completed the inside shape. This works well with both straight and curved sides.

If you click on the photo below to enlarge them, you can see more clearly the square in the upper left has the four cuts to the corners and then I will cut up the four sides to complete the cut out square.


Only one side of the square left to cut in this window frame! Look at all the little triangles that have been cut! Confetti! :<)


See the arrow in the middle of the window frame? It also says TOP below the window above, but don't know if you can make that out.


When the window centers were cut out, I then separated and cut the two individual windows (I had drawn lines around them for the depth of the frame to equal the thickness of the inside cross), turned them to the right side out and there you have it! Window frames! :<) That was fun, but I had to cut 12 window frames for this house! I was so happy the back of the house was a solid wall!


I outline ALL of my fussy cut pieces - inside and out - with withe either a black or a brown marker, depending on the papers I am using.


Add some white Elmer's School Glue - my glue of choice for paper mache projects - on the paper piece, and glue to the appropriate window. Did you remember to label with an arrow and if it was right side or left of the wall you were working on? :<)


And there you are - a house with window frames! I also added a door piece to get a perspective of how to proceed with that. Hope you enjoyed the mini tutorial!


Thank you for visiting my blog today! Sun is out here today in this part of WI but was it COLD this morning! Back to a turtleneck today for the first time - Fall is definitely here! Wishing you all good things today!

Hugs,

Barbara Diane

Wednesday, September 30, 2015

Halloween House Continues on WOYW? Wednesday

Hello!

Today being "What's On Your Workdesk?" Wednesday - I have more photos of the progress on my Halloween House. I am using papers from a combination of Graphic 45 paper collections and will list them at the end of the project. I am still picking and choosing, so it changes every day. I have not done this before on any project - it has always been using papers from only one collection, But this project I started mixing the collections as I found I needed a little bit more of this and a little bit more of that as I went along.

Here the roof is covered with the base papers.


The house is covered with the base paper - and with the roof on is starting to look awesome!


Go to http://stamping-ground.blogspot.com/ to find out what WOYW? is all about!

Thank you for visiting my blog today! It is SO much colder here in this part of WI - frost in areas last night. It is definitely Fall weather! It is now only 45 degrees this morning at 9:00 am. Our high today is to be only be 61 degrees! I think the heat goes on soon! Wishing you a good one!

Hugs,

Barbara Diane

Tuesday, September 29, 2015

Starting A New Halloween House for 2015


Hello! 

Time to start my 2014 Halloween House! I love making houses and any kind of altered art using a paper mache item as the base and covering it with Graphic 45 papers. It always includes a lot of planning, fussy cutting and gluing and I love the entire process;

The last Halloween house project I made was my Haunted House in 2013. You can see a photo of that house on my side bar and also at  http://www.whimcees.blogspot.com/2013_10_01_archive.html - my October 31, 2013 post, which includes photos of all 4 sides of the house. I have it on a turntable base for easy viewing.

I have been working on this year's Halloween House now for some time and it is coming together nicely. My buddy Jimbo fights for the table as he loves to sleep there while I am working, but he gives it up when I need to use the paper cutter or remove him to take a photo. :<) My son Jim painted the house for me using a black acrylic paint - it usually takes 2 coats to cover. I am never sure how much of the base paint will show in the finished project so I want to make sure it is a good base coat. It's at a weird angle in this photo as it looks like the house only has a standing front - if you didn't notice the inside matte color.


I made a pattern for each of the 4 walls and cut the paper I chose to use on the outside of the house. This is the backside of the paper as I didn't want any ink lines to show on my chosen paper side in case I mad an error when transferring the pattern.


The outside paper.


The lighting makes such a difference in the color, but the top photo is with a florescent light shinning on it - taken when I was working at night - and the bottom photo is the next morning.


I took a photo of the total lunar eclipse and although it is not very clear, it was really beautiful! It looked so small up in the sky over our apartment building!


Thank you for visiting my blog today! We had a heavy rain all night and this morning here in this part of WI - very loud rain! It is now sunny again and another beautiful Fall day. Wishing you happy day!

Hugs,

Barbara Diane