My Whimcees

My Whimcees

Monday, April 26, 2010

I Want One Too!

Hello Again!

Sometimes a brother wants HIS card! Big sister got her bluebirds - "I want one too!" :<)

So an emergency session was necessary this morning where I made this fat and happy little robin, who is jumping out of the grass to say 'Hello!', for the younger brother.

I leave a quick photo of this cheerful little guy with you until I return next Monday. :<)

Thank you for stopping by today and thank you all for the lovely comments and e-mails. I love them and they make my day! :<)

Hugs and good wishes,

Barbara Diane

MIA Until Monday, May 3

Hello!

I will absent from my blog until next Monday.

I made this little card using some of the beautiful roses that my friend Helen created.


Thanks for stopping by today!

Wishing you a great week full of creative spirit, good health and happiness!

Barbara Diane

Friday, April 23, 2010

A Happy Card

Hello!

I wanted to make a happy card to send to a happy little girl. No frills, shading, special effects. No complicated techniques. Just a happy and colorful card. I hope she likes it. :<)


Thanks for stopping by!

Wishing you a happy weekend!

Barbara Diane

Wednesday, April 21, 2010

Note Paper Holder

Hello!

Today's project is a Note Paper Holder - a wonderful easel box that I made using a new tutorial I purchased from Kim Score at Paper Punch Addiction. Isn't it great? I love it and have made another for myself, as this one is a gift for a friend. You can see Kim's great punch characters and project tutorials available on her blog at http://paperpunchaddiction.blogspot.com/.

The lovely image is one of Maurie J Manning's stamps. I absolutely love anything she draws and the children's books she has illustrated are beautifully done! You can her creations on her blog at Mo's Digital Pencil Too! http://www.digitalpenciltoo.blogspot.com/ If you have never seen her work you are missing a huge wealth of wonderful!


Thanks for stopping by today! And thank you for all your lovely e-mails and comments! They mean so much to me - each and every one!

Storms today here in WI - we do need the rain. I love this time of year - the flowering trees are all starting to blossom out and they are so beautiful! Other trees are all getting their leaves and at this stage of Spring they look so frilly and lacey! Love it! :<) Gives me hope on my darkest days to look at this beauty! I can't wait for the lilac season - their perfume is heavenly! Wishing you everything good today!

Barbara Diane

New Award

Hello!

My friend Helen at "Let's Create" has passed on this award to me that she received from a blogger in Bulgaria. You can find Helen's great cards and projects, which include her beautiful quilling, at http://helenmade.blogspot.com/

The blogger who sent it to Helen is "Beautiful Chaos Art" and you can see her blog at http://beautifulchaosart.blogspot.com/ She has some beautiful projects, so check it out. She has a translator on her blog so one is able to read her posts. :<)

Her name is Svetla Doichinova. Thank you for writing Svetla!

Thank you Helen for thinking of me! I have written to the blogger to ask what the title of this blog says. If anyone out there can translate this for me, please let me know! :<)


The instructions are to pass it on to 10 people. The following links are all to great blogs - give them a look, you will be glad that you did!

http://www.creationsbypatti.blogspot.com/

http://creationsonpaper.blogspot.com/

http://karensdoodleskidschallenge.blogspot.com/

http://littlehandsdocrafts.blogspot.com/

http://quillynilly.blogspot.com/

http://rynscraps.blogspot.com/

http://www.sweetasagumdrop.blogspot.com/

http://stampathy.blogspot.com/

http://stampingmoments.blogspot.com/

http://whimsical-wendy.blogspot.com/

Thanks for stopping by today!

Wishing you a great day!

Barbara Diane

Tuesday, April 20, 2010

Secret Panel Birthday Photo Album Card

Hello!

I am happy to say that I did figure out how to make a secret panel card in one piece and made this birthday photo album card for a friend to record her daughter's birthday with a couple of photos and a bit of writing.


When you open it . . . .

The other side of the middle panel . . . it reads "a person can make such a difference and that person is you"

The opened hidden panel . . . it reads "if nothing ever changed there would be no butterflies"

I also covered the back side of the card/album. The layers of CS and DP make this card heavier and sturdy - more like a small book - which I liked. Hope you do too. :<)

Thanks for stopping by today!

Beautiful day here in WI - hope you have great weather where you are also! :<)

Barbara Diane

Monday, April 19, 2010

Back Home

Hello!

I am back home from dog sitting with my dear friend Brandy. I took Jim with me so he could also enjoy being in the country and spending some time with her. He loves his buddy Brandy, as I do, and she got a lot of love and attention from her two fans! :<) She returned it to us both, as she is very affectionate and sweet natured. I was glad that Jim was with me as I was not feeling well and it was good to be with them both and see them interact together.

Here is the lovely Brandy, resting in front of the flower garden that was a beautiful combination of red and yellow color from the tulips and daffodills and the bright green of new growth.

Jim got lot of kisses . . .

and had a willing listener and buddy to enjoy the quiet of the countryside and sunshine . . .

and I was very happy.

Thanks for stopping by today!

Wishing you a great day! The sunshine is wonderful here in WI!

Barbara Diane

Thursday, April 15, 2010

My Pumpkin Head Doll

Hello!

No new projects today - too much chaos going on at my house the last few days. So I thought you might like to see some photos of my Pumpkin Head Doll - one of my favorite dolls that I have made. She is a bright and happy little doll - comforting somehow!

She has a wool felt head and hands and is soft sculpture, her knees and arms are jointed, she has wired hands, her pleated pantaloons and dress are double sided and have finished seams.

I have started another doll - the first one in a long time. I need to return to dollmaking and make it part of my creative process along with the cards and paper projects. I miss seeing the new characters and bears coming to life in my studio. Hopefully I will have something to show you soon.

For now, here are some photos going back down memory lane. The Pumpkin Head Doll doesn't live with me anymore, she has a new family and a sweet new mom who loves her and named her Eloise. I received a card from 'Eloise' shortly after she went to live in her new home. It says . . .

"Dear Mom,

Thank you for finding me a new home. I met one of my big sisters. She's funny and likes my knees and my pantaloons. I can't wait to meet the rest of them. For now, we're watching the Olympics and I have my own sofa!

Love,

Eloise"

She will always be my happy Pumpkin Head Doll and have a special place in my heart. This was her beginning. :<)


Thanks for stopping by today!

I will be leaving tomorrow and spending this weekend dogsitting my favorite dog Brandy. After spending 3 days with my best buddy in the quiet of the country, in a house with windows all around, a big kitchen to cook in, a patio and a huge back yard, feeding the birds - I hope to come home refreshed and rested and have new projects to show you next week! :<)

Wishing you a great weekend!

Barbara Diane

Wednesday, April 14, 2010

Fantastic Blog Candy at "scrappyjan Designs"

Hello!

Check out this fantastic variety of blog candy - so many wonderful items - being given away by Janiel on her blog "My Little Pieces of Art" http://scrappyjandesigns.blogspot.com/ !

Congratulations on your achievements Janiel! Some lucky person will be in seventh heaven to win this great prize! :<) You all have until May 1st to leave a comment, etc. Good luck!

Barbara Diane

Tuesday, April 13, 2010

Secret Panel Card II

Hello!

Today Part II of the Secret Panel Card will show you how to make the finished card into a 5 1/2" x 8 1/2" card. To start, you will need two pieces of 5 1/2" x 4 1/4" colored CS that was used to make your base card. You will also need two additonal 1 7/8" x 5 1/2" white strips.

Put two strips of Sticky Strip along the sides of the end pieces of the card - this is where the two new sections will be attached to extend and create a larger size front and back of the card.

Attach the two sections.

Be ure to CHECK FIRST that you are ATTACHING THEM TO THE CORRECT SIDE of the card! Take a few trial runs before you glue the sections on! Look back at Part I from yesterday's post if you are confused, as those photos may help you.

You want the inside panels center fold to be at the front and the open ends of the two panels to meet together at the back. This creates the secret panel when it is then opened from the front.

Like this. This is looking down at the card from the back. The front of the card is on the left of this photo and the back of the card is on the right.

When the open ends of the two panels meet in back then the secret panels open out from the front. Like magic! :<)

Here the card is lying on it's back. You can then cover the overlapping lines with the additional strips in either of the following two ways of placement - or in whatever creative way seems best to you! :<)


This is now the front and back of your card. Not skinny any longer!

I finished mine as a birthday card for my friend Sal, who's birthday is on Wednesday. My lovely blogger friend Helen sent me this beautiful white embossed Top Note as a protective layer on the top of the gorgeous thank you card she mailed to me. I thought it also so lovely, as I don't have this embossed plate, so I used it for the front panel of Sal's card.

I trimmed off the outer edge of the Top Note, outlined the embossed design with black ink, colored in with markers, added a little Stickles for a bit of bling (as I did on the inside the card) and then turned it upside down before adding the sentiment. I liked that better than to have the words at the top. :<)

The completed card inside - before folding the center panel together.

The secret panels when open.


The end. :<)
All the while I was gluing on the front and back panels, I thought - there must be a way to make this all in one piece of CS - as I didn't like the ovlapping line on the inside where the larger piece of CS extended. So I worked out a pattern to do that and will have that as Part III - if you think you can stand more Secret Panel tutorials! :<) Maybe I will post some other projects in between for a change of pace.

Thanks for stopping by today!

Wishing you a great day! If you have any questions I will be happy to try to answer them.

Barbara Diane

Monday, April 12, 2010

Secret Panel Card Tutorial Part I

Hello!

Many of you requested that I have a tutorial on how to make the Secret Panel card. Thank you for asking and here is Part I, which will take you through the basic construction of the card's hidden panel. Have fun! :<)

Starting with a 5 1/2" x 8 1/2" piece of CS, fold it first in half and then each side in half again. This will form a 'tent' when you lay the card face down.

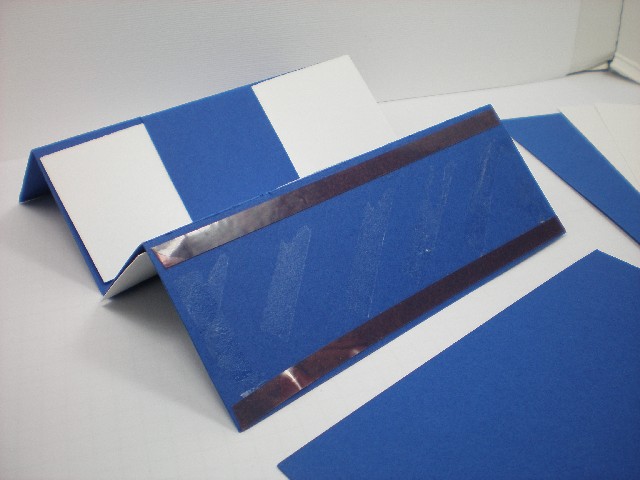
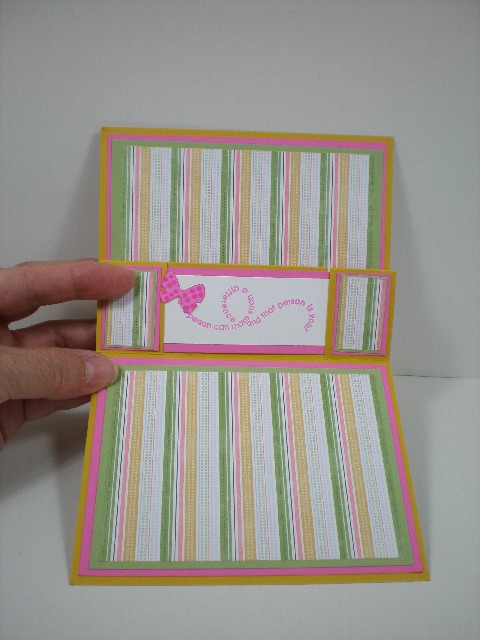
With the CS folded in half, cut two lines to meet the first fold line - creating a center section. You can measure to make 3 equal sections or just eyball the distance, making one section larger than the other. This is what I did. :<)

I pushed the center section back for this photo so you could see the three sections more clearly.

For the inserts you will need two strips of 5 1/2" x 1 7/8". One is inserted under the center section and one is over the center section to look like this.


When the strips are in place, fold the card together.

When closed, gently pull apart at the center and you have the secret panel that will open to look like this!


Thanks for stopping by today!

Tomorrow Part II covers how to finish the card so that it is a 5 1/2" x 8 1/2" card.

Wishing you a good day today! Cold and rainy here in WI.

Barbara Diane