My Whimcees

My Whimcees

Sunday, February 28, 2010

Have You Heard of Scraplings?

Hello!

This is a scrapling. :<) These small tags/gift cards are made using the strip of CS - or scrap - that is left after cutting the CS to create a 4" x 4" square card. What a great way to use those scraps! :<)
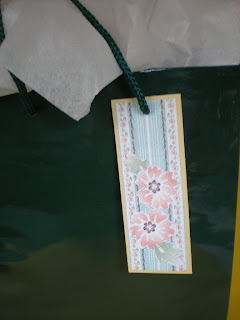
This is a set I made of a 4" x 4" card and a gift tag - made from the remaining strip of CS - my first scrapling! :<)

I saw one today on someone's blog and decided to Google "scraplings" to see what samples I could find. This seems to be a new trend so I wanted to see what was out there.

Sometimes when one is looking for something on the Internet, a wonderful new blog is found. I came across one today - in my search for the scraplings. The blogger's name is Heather Scott and her blog is "OZ-somestamps" at http://stampez.typepad.com/ Please do check this out as she is one talented woman! I must have printed 7 project tutorials and watched many of her videos.

Heather's posting for the scrapling she made was way back on January 10, 2009 - so you can see she is on top of things! :<) She very cleverly cut a slit on the top of the scrapling to the punched hole and then all she had to do was bend that slit open and slip it over the handle of the bag! No tie necessary! So I did that too! Thank you Heather!

One of the bits of information I found was that "the scraplings were the brainchild of Shari Carroll over at Hero Arts" and there are many samples to be found on many blogs. I am working on more of the little scraplings and will post photos of them at a later date. But I have finally finished some projects that I have been working on so I want to post them first. :<)

I do not remember where I first saw mention of a scrapling today that sent me off on the grand search and after spending hours looking at so many different blogs and samples, I have not been able to find it again! So when I do, I will post the name of that blog!

It was one of my followers! Zebline at "Stampathy"! http://stampathy.blogspot.com/ I always look at the blogs of my followers first thing every morning, in addition to as many on my favorites list that I have time to look at. I remembered it was Zebline and when I went to her blog - there it was - the scrapling! Thank you Zebline for sharing your wonderful project! :<)

Thanks for stopping by today!

Wishing you a great week!

Barbara Diane

Thursday, February 25, 2010

Love In Lilac

Hello!

Today's card is using one of Mo Manning's wonderful images! I don't use pastels often, which is too bad as there are so many beautiful colors available - lilac being one of them!

So here is Lilac Love.


Thanks for stopping by today!

My goofy camera is acting up again so please excuse the poor photos as they don't show the true lovely colors of the card.

Wishing you a great Friday and weekend!

Barbara Diane

Wednesday, February 24, 2010

Look What I Won! :<)

Hello!

The posting said "CONGRATULATIONS to Barbara at Barbara's World of Whimcees! You are the winner of my 100th post giveaway!" I was so excited!

I had discovered a new blog http://candycreek.blogspot.com/ and enjoyed seeing all the creations of Robin, who lives in the foothills of the Appalachians in East Tennessee on the lake. It must be beautiful there! And she was having a contest!

When I first saw this little doll that was included in the prize to be won - "The lucky winner will receive everything shown in the picture above which includes an Annie doll, tooth fairy pillow, candle mat that is embroidered with Faith, Hope and Love, a pair of black earrings, blue earrings, red earrings and a red bracelet to match" - I thought what a special little doll she was, So I entered my name in the contest. And I won!

She arrived in the mail yesterday - with all the other wonderful gifts! I just love her! She sits in my living room and fits right in with my doll family. :<) What fun to win! Thank you Robin! And she smells just like cinnamon! :<) I am calling her Beth.

The doll, the tooth fairy pillow and the candle mat.

Isn't this the cutest face!

Look at these great shoes!

The black earrings, the blue earrings and the red earrings with a matching bracelet. All of this loveliness - so prettily packaged!


I am so happy that she has arrived! And did I say, she smells just like cinnamon? :<) I love this little doll! Thank you again Robin! Your kindness has made me a happy woman!

Please do check out Robin's blog at http://candycreek.blogspot.com/ and see all her creations! Leave her a comment - become a follower! :<)

Barbara Diane

Monday, February 22, 2010

Easel Card Topper on Matchbox

Hello!

I love the easel card! It is such a great way to show off a special card without a stand. I also love the matchbox die and so I decided to see if I could combine the two. This is my easel card topper on a matchbox. :<)

Closed:
Open:
To make the easel card topper, cut a strip of matching CS that is twice the length of the top of the matchbox and score the strip in half and then score the remaining half in half. Hope that makes sense. :<)

This longer piece will become the structure to hold the easel card front. Cut another piece of CS that is the same dimension as the top of the match box. This piece will be the actual card front.

Once again I used one of the SU landscape DP and cut out the flowers/leaves (I first colored them in with my matching SU markers to make a solid print).

Fold at the score lines and cover the longer end of the strip with DP. Create a card front.


Put adhesive strips on the end piece. I love and use Score Tape when I want to be sure of the pieces staying glued together. I also used Snail in the portion between the tape.

Remove the strips and attach the card front. **BEFORE YOU DO THIS MAKE SURE YOU HAVE THE CORRECT LAYOUT! Easy to put this on backwards - ask me, I know! :<)

This is how the matchbox and the easel card should look before you combine them.


Attach the easel card to the matchbox and there you have it! :<)

I then attached additional flowers with dimensionals to create a raised edge to anchor the easel card behind when it was opened.


Thanks for stopping by today!

I hope you enjoyed the easel card topper on the matchbox! :<)

Barbara Diane

DP Matchbox

Hello!

Sometimes a paper's design is like a landscape and covers the entire sheet of paper - too big to use for a card and more applicable for a scrapebook page. I don't do scrapbooking and so sometimes if I don't like the pattern on the backside of the landscape design, these papers just stay in my supplies forever. :<)

I was making a matchbox and this DP from SU caught my eye as the colors matched so well and the design was sort of Spring-like. It had been sitting in my supplies for quite some time so decided to cut out and use some of it to cover this little box.


Thanks for stopping by today!

I have been MIA for a few days - thank you to all of you who sent kind e-mails. Wishing you well and that the week ahead brings you good things!

Barbara Diane

Wednesday, February 17, 2010

A Lovely Thank You Card From Carol!

Hello!

I received this beautiful thank you card from Carol Hurloch in Georgia - who won my doll Millie. Isn't it gorgeous! I love red and white together and this is stunning! I tried to take a photo that would show all the lovely details of the card - but you can click on the photo to enlarge and see all the sparkle! I love the beautiful border, the butterflies, the flowers and ribbon, the sparkles! I love it all!

Thank you Carol! :<) I hope that you and Millie are well and happy!


I realized that each time I mentioned 'Carol in Georgia' in a post that I didn't add a link to her blog! I don't know how that happened! She has a wonderful blog - "Chocolate, Crafts and Bears, Oh My!" Isn't that the greatest name! :<) Do hop over to visit her there as you will be glad that you did as Carol has the most creative and lovely cards and projects! http://chocolatecraftsandbearsohmy.blogspot.com/

Thanks for stopping by today!

Wishing you a good day!

Barbara Diane

Tuesday, February 16, 2010

February Page of Birthday Calendar

Hello!

I almost forgot to show you the February page of my birthday calendar I am making this year.


Thanks for stopping by today!

We have sunshine and blue sky this morning with the overnight snow so it didn't seem so bad scrapping the ice/snow from the car today! It makes one know that Spring is coming soon! :<)

Barbara Diane

Monday, February 15, 2010

A Thank You Card

Hello,

I sent this little thank you card to Jim as he created a beautiful wall art for me for a Valentine's Day gift. I covered the image with Versamark and embossed so that it looks like tile. The flowers are doodle dots. If you click on the photo to enlarge, you can see this as well as the layers.


Thanks for stopping by today!

Wishing you a great Monday!

Barbara Diane

Saturday, February 13, 2010

Jim's Card

Hello!

I liked my little bee so much I decided to make Jim's card with him on it. Jim loves red and sparkles/glitter so I used red Stickles to make all the dots on the letters and around the heart and on the inside border and paper with sparkle hearts. :<)


Thanks for stopping today!

Wishing you a great day!

Barbara Diane

Friday, February 12, 2010

A Short Tutorial on the Valentine Bee

Hello again!

Here is the tutorial for the Valentine Bee. I am sorry that it is so short. This is not a good day today for me but I wanted to post this for you in case you wanted to make one for a Valentine card - so I hope that this is helpful. If you have any questions, please do let me know and I will be happy to answer them.

When surfing the Internet I saw this cute photo of a Valentine centerpiece and immediately wanted to sit down and create this little bee. So, with this as my inspiration, I started playing with all my paper punches to see what I could do.

These are the punches I used in addition to the "thickers" foam letters. I have never purchased letters before so this was a first for me and now I am hooked! :<) I found them at Archiver's.


And here are the individual pieces that were made using the paper punches. If you match them with the punches in the photo above it should be self explanatory. If not, let me know!


And here is the little Valentine Bee that I created! Enjoy!


Wishing you a very Happy Valentine weekend! :<)

Barbara Diane

Happy Valentine's Day!

Hello!

I made this little Valentine Bee to bring you Happy Valentine Wishes! I hope you like him! :<)


I will be posting a tutorial on the bee later today. :<)

Wishing you a good day today!

Barbara Diane

Thursday, February 11, 2010

A Kreativ Blogger Award!

Hello!

I received a Kreativ Blogger award from my lovely blogger friend Gaby who lives in Germany. You can visit her blog "Stampathy" at http://stampathy.blogspot.com/ and it can be translated to English. She has a wonderful blog, so do check it out! :<) Thank you Gaby!

The rules of passing on this award are as follows:

1. Thank the person who gave it to you.
2. Copy and paste the award to your blog.
3. Link to the person sending you the award.
4. List 7 things about yourself.
5. Nominate 7 bloggers to present the award to.
6. Link to this posting on your blog.
7. Notify the 7 people you nominate by leaving a comment on their blogs.

Seven Things About Me

1. I love sunshine.
2. I have 3 sons, 5 grandchildren and 2 great grandchildren.
3. I am not old enough to have 2 great grandchildren. :<)
4. Thanks to my son Jim I now like Country Western music - my favorite is Keith Urban.
5. My favorite dessert is strawberry shortcake.
6. I try to stay positive and count my blessings, of which I have many.
7. I LOVE blogging! :<)

Here are my 7 nominees in alphabetical order: This is just TOO hard to pick only 7! Maybe I could repeat this a number of times? :<)

http://chocolatecraftsandbearsohmy.blogspot.com/
http://www.creationsbypatti.blogspot.com/
http://helenmade.blogspot.com/
http://jackiemthomas.blogspot.com/
http://joaniscardsmadebyhand.blogspot.com/
http://kyliescraftcorner.blogspot.com/
http://valitasfreshfolds.blogspot.com/

Thanks for stopping by!

Wishing you a great day today! Thank you again Gaby! I love receiving this award! :<)

Barbara Diane

Matchbox Top Opening Tutorial

Hello!

Today I have the tutorial for changing the classic slide matchbox to a top opening box. I love my matchbox die but wanted to also be able to make a treat box that opened from the top, without having to purchase another die.

In this photo the classic slide matchbox is at the back and the top opening treat box is in front. This is how I change the assembly of the box.

In the photo below are the two basic pieces that are cut using the matchbox die.

In the photo, the bottom of the box is on top and the top of the box is below it. Be sure when you begin the assembly of the box to go over all the crease lines with your bone folder.

To start to assemble, I use Score Tape (I love that tape as you can tear it!) across the end of the box because you will want a strong tape to keep it together when the box is used. I also put a bit of Snail adhesive at the inside of the corners to hold them in place when I fold down the end piece.

With the corners in, fold down the end and crease with your bone folder.

Using a piece of Score Tape across the short end of the box top, assemble the top and the other end of the bottom of the box.

Remove the paper covering of the Score Tape on the sides of the box and fold each side down.

The assembled classic matchbox.

To make a top opening I do the following:

Punch a half circle using a 3/4" circle punch in both the short end of the top piece and again in the front of the box bottom. Then round the corners of the long end of the top piece with a corner rounder punch.

Put Score tape across as shown in the photo below and you can see I that I also used the Snail adhesive in between the tape for stability.

Then simply remove the paper from the Score Tape and attach the front of the top piece, matching the punched half circles and then doing the same to the bottom of the box.

Remove the paper covering from the Score Tape and attach the back of the box top.

And there you have it! A matchbox that opens from the top! :<) Now you can decorate it in any manner you please!


Thanks for stopping by today! I hope that you enjoyed the tutorial!

Wishing you a great day today! We have lovely sunshine here in WI which certainly makes the cold weather not so bad. I am so looking forward to Spring though! :<)

Barbara Diane