My Whimcees

My Whimcees

Friday, October 30, 2009

Week Off - Back on Moday, November 9th


Hello,

As we all know, life can become overwhelming at times and I find that I am in the middle of more than I can handle at the moment. I need to withdraw from all but what I have to attend to so I will be taking the next week off from my blog and return on Monday, November 9th.

My birthday is next week so I guess I can call it a birthday gift to myself. :<) I will check on all of you to see what you are doing and hopefully I can find the time/energy to work on some fun projects so I will have something for a Show-n-Tell when I return.

Take care. Wishing you a good week! See you on the 9th!

Barbara Diane

Thursday, October 29, 2009

The Eyes Have It!

Hello!

Ellen Kemper at Blinkin' Thinkin' & Inkin' is a master at coming up with all these wonderful and original characters using the paper punches. In fact, I purchased SU's Butterfly Punch because of seeing the fun ways she would use variations of this punch. When I saw this "eyes" Halloween card idea on her blog yesterday I was so happy I had done that - I had to make some of my own!

Here are a few of the cards I made using the butterfly and circle punches. I can now see how one can become hooked! Thank you Ellen, for this idea! Your creations make me smile every day! :<)


You can check out Ellen's blog at http://blinkthinkink.blogspot.com/

Thanks for stopping by today!

Tomorrow I will have photos of my Halloween decorations on my apartment door that became a add-a-day project that had "followers" of its own! :<)

Barbara Diane

Wednesday, October 28, 2009

Mr. Crow

Hello!

Another of my polymer guys. This little crow is showing off his new hat! :<)


Thanks for stopping by!

Wishing you a good day today!

Barbara Diane

Tuesday, October 27, 2009

A Ghostie Hello

Hello!

One of my little polymer Ghostie guys and his small buddy to wish you a happy day today!


Thanks for stopping by!

Barbara Diane

Monday, October 26, 2009

Halloween Bat Treat Holder Tutorial

Hello,

Today I have the Halloween Bat treat holder tutorial for you. I had given up hope of ever being able to complete this post, but I am trying again. I have had to start over so many times that I was thinking of just skipping today altogether but I persevered! :<) There may be errors in the spacing of the photos, etc. but I am afraid to try to correct anything again as I will find myself in worse shape! So here it is. I hope you enjoy it! :<) I think the old Halloween spirits were having some fun with me this morning!

Every so often I receive an e-mail from Better Homes & Gardens site and this time it had Halloween crafts listed, so I had to check them out. This cute little bat treat holder caught my eye and I had to make one to see what it looked like! You can find the template here:
http://www.bhg.com/holidays/halloween/crafts/bat-cone-treat-holder/

First I printed and cut out the template - it comes in two halves and has to be taped together. Then I traced it on SU black CS. I like their CS as it is a nice weight to work with and the colors are very vibrant. Their black CS is a very dense black and the best I have found. My camera has distorted the color in the 2nd and 3rd photos for some reason and they look gray so please just ignore. :<) Be sure to trace the score line on the right under the wing (where the treat holder will meet at the back when assembled), the lines on the wings and the eyes/fangs placement on the face. The dotted line on the left is only to line up the two parts.


I wanted to use an Iridescent paper called Purple Haze to make my bat holder but it was too thin to use alone, so I glued a sheet of it to the back side of the black CS using a Tombo adhesive.
Isn't it sparkly and pretty! I also have another called Orange Peel and I am going to make a second bat holder from that. I am sorry that I do not know the name of the brand but that is all that is on the back of the paper.

After I had the paper glued with the Tombo adhesive and cut out the bat, I discovered it wasn't going to hold. So I used my new favorite, favorite, favorite double back tape by Score-Pal and the name brand is SOOKWANG. I was seeing it used more and more on other stamper's blogs and wanted some of my own! A friend of mine found it for me at our local Gina K store and you can also find it online. I absolutely love it as you can TEAR it - no more need to pick up a scissors and cut each strip of tape - and the backing peels off without the static electricity of the red backing on the Sticky Strip, which I have to admit drives me crazy. :<) I still use the Sticky Strip as it has the different widths, but this new tape works so well, is just as strong and using it goes so much faster! I LOVE it!


After I re-glued the Iridescent paper to the black CS of the cut out bat, I realized I needed to also glue the Iridescent paper to the other side of the bat's wings as they would be brought back around when the treat holder was assembled and would be visable from the front. (The back of the bat's wings when it was flat would become the front of the wings when assembled - if that makes sense.) If you have any questions I would be happy to help.

This photo shows the back of the cut out bat with the Iridescent paper glued to the wings.

This photo shows the front of the cut out bat with the Iridescent paper glued to the back of the bat before the wings are again cut out. (The underside of the Iridescent paper appears as a gray area under the bat.)

Then I cut around this layer, folded the wings back and around to meet and cross and glued the back with the tape at the score line. (You can see it on the right side under the wing.)

I added some orange Stickles to the lines on the wings, gave him some orange sparkly eyes and fangs, added a bit of purple ribbon to hang the treat holder and filled it with candy. Now he is good to go and waiting to be given out on Halloween! :<)


Thanks for stopping by today! After over two 1/2 hours and many attempts, I am finally able to post today. This took longer to do than to make the bat treat holder! Hopefully tomorrow's post will not be so difficult!!! :<)

Wishing you a good Monday!

Barbara Diane

Friday, October 23, 2009

A Sparkly Skeleton For My Door with *Update

Hello!

A photo of the finished door!

It was great fun! It started with the witch doll given me by my good friend Fayette, who is a fantastically talented polymer clay artist. (See her site on my Favorites) Then I added the bats, then the haunted houses . . . . It took on a life of its own, with other tenents where I live coming by daily to see what had been added. One of the women called to say someone from the newspaper should come by to take a photo, another was on the other side of my apartment door taking a photo as I walked out - startled us both! :<) It ended up with 18 different projects. It was such fun!

This year I also had everyone come to my door to collect their cards and treat boxes and I loved it! Before I would put them by the apartment doors, but this year I left notes to come to my apartment to pick them up. It was just like having trick or treat only with adults! :<) One of the men came with his note in hand, saying "I have my ticket to get my treats". Loved it!


Hello!

Well, I was going to post a tutorial on making a Halloween bat treat holder this morning, but got a bit sidetracked on another project!

I have been making paper Halloween characters to put on the door to my apartment - adding something different every day - and it has evolved into a Halloween landscape across the door. Yesterday I decided the scene needed a skeleton but they are a bit difficult to make freehand with all those bones - so I took another path.

I went on-line and printed a Halloween clip art that had a skeleton standing in a pumpkin patch. I didn't want the pumpkins so cut out just the skeleton from the picture - took a bit of cutting! I had printed it on copy paper as my printer does not take CS and this also made it a bit more fragile to handle when cutting. Then using purple and green Stickles, I covered the hat and stick completely to make them sparkle.

The bones of the skeleton looked so dull next to the sparkly hat, so I decided to cover the teeth - maybe this would liven up the bones! That looked so good that I decided to cover ALL the bones to make the entire skeleton sparkly! I added sparkly pop dot eyes and a diamond top for the stick (I had cut off the small skeleton head that had been on it in the clip art) and he was finished! That took lots of Stickles and time but I loved the results!

Even on the black CS the photos don't show how sparkly he is, but the hat gives you an idea! I think he will look great in the scene on my door! :<)


Thanks for stopping by today!

I will have the tutorial for the bat treat holder on Monday! Wishing you a great weekend!

Barbara Diane

Thursday, October 22, 2009

More Treats Ready to Go

Hello!

More little treat bags waiting to be given away. Having it here all the time now, I am eating way too much of this Halloween candy when packaging it up for the treat containers! :<)

The fun Halloween paper is from Bo Bunny and the greeting is from the SU stamp set Holiday Best. I am sorry to say I have forgotten the name of the company that made the stick on pumpkins and the treat bags were cut out for me by a friend of mine using a die cut. Using them all together they made great treat bags.


Thanks for stopping by today!

Barbara Diane

Wednesday, October 21, 2009

Little Monster Treats

Hello!

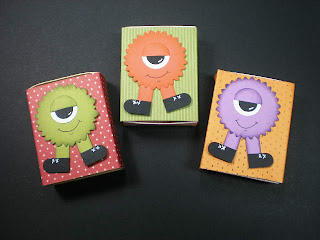
These little one-eyed monster guys are so cute - I love them! And they are so easy and fun to make! I put them on match boxes filled with chocolate and this is one of the things I will be giving out as Halloween treats to my friends.

I came across a video tutorial on making these sweethearts and remembered seeing them earlier this summer when the artist first created them. After watching the video, I quickly went to make my own little monster from my notes before I forgot and found myself happily making quite a few in many colors. My happiness ended when I came back to my computer to copy the website information down to post today and discovered that I had closed the Internet! Why I did that I have no idea!

When I went back to try to find the video again I could not, no matter how long I searched. I went through so many searches and looked at so many sites that I got a headache. But no luck. I will keep looking, but if anyone out there knows who it was who created this little guy, please let me know so I can give them the credit they deserve and provide you with a link to the video.


Thanks for stopping by today! I will keep looking for the video tutorial!

Barbara Diane

Tuesday, October 20, 2009

Post It Holder Tutorial

Hello!

This past weekend my brother and sister-in-law came to visit and it was so great to see them as it had been almost a year since their last visit. Dick and Bonnie have always been most supportive of my artwork in all areas and generous with their kind comments. While they were here I was showing them various projects that I had made and Bonnie said that she was wanting to make the Post It holder and had purchased the supplies - but she did not have the pattern. I put together this tutorial for her.

I first saw the holders on a video on Angie Kennedy Juda's blog Chic'n Scratch. You can see the video and Angie's great creations at http://chicnscratch.typepad.com/ I loved the little holder and made some right away - many of which I posted photos of here on my blog. They are great for gifts and are easy to make. The CS can be embossed or stamped prior to assembly or a bit of ribbon and a strip of CS can be added as I have done here.

Bonnie always liked blue - so here is the tutorial for her. Have fun Bonnie! :<) Send me a photo!

The measurements of the CS are Eight 1/2" by Three 3 3/8" - scored at Three 3/8", Four 1/8", Four 7/8" and Five 1/8" which will give you measurements across of 3/8" (back cover), 3/4" (spine), 3/4" (spine), 1/4" (raised edge) and 3/8" ( front cover).

Fold the CS in half at the Four 1/8" score line. Use the bone folder to crease a sharp fold.

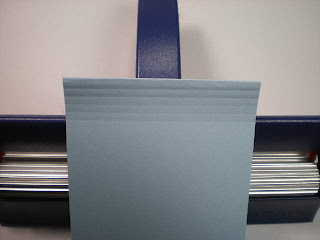
Run the folded edge of the CS through a Crimper about 3-4 turns of the handle. This will crimp the folded 3/4" sections together. If this does not make sense, the photos below should help.


Apply two strips of Sticky Strip to one of the 3/4" sections, remove the covering and glue them together . . . .

to look like this. This will form the "spine" of the holder. The last 1/4" fold will raise the cover of the holder to accomodate the Post It Notes. I take the individual pads apart to 1/4" sections before adding one to the holder.


I added a bit of ribbon and a strip of CS cut with a scalloped lace edge punch and my Post It holder was finished!


Thanks for stopping by today!

Barbara Diane

Monday, October 19, 2009

A "Belt" Card Closure

Hello!

Another Monday is here - I hope that you all had a nice weekend!

I love the 'belt' closure of this template. It is called the Big Buckle Card and the tutorial is by the very talented Beate Johns. http://www.splitcoaststampers.com/resources/tutorials/big_buckle_card/


Thanks for stopping by - wishing you a good day today!

Barbara Diane